reading-notes
HTML(Hyper Text Markup Language)
HTML is a markup language that builds out the structure of your content. It’s based on a series of overlapping elements that make the content appear or act in a certain way. They can include text appearance enhancements, adding images, size adjustments etc
Make sure to use proper tags to get the effect you want. This <p> tag build the line as a paragraph
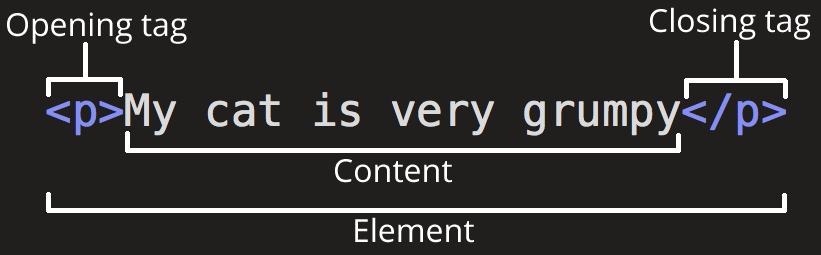
Take a look at this image. The opening tag <p> is what helps establish what we are going to do. We put the name of the element we are using in angle brackets. This is us saying “I want it formatted this way”
The closing tag</p> lets us know to end that formatting style
Our Content is everything we want to display in that formatted style
When you put it all together it’s called an Element.
Elements can have attributes that contain extra info about the content. Things like the class attribute allow you customize specific elements with their own style sheets and custom information. We simply put a tag on it to ID it.
So what should an attribute contain?
An attribute should always have the following:
- A space between it and the element name (or the previous attribute, if the element already has one or more attributes).
- The attribute name is followed by an equal sign.
- The attribute value is wrapped by opening and closing quotation marks.
Nesting Elements
We can nest elements within each other. Take a look at this example
<p>My cat is <strong>very</strong> grumpy.</p>
Gives us
<p>My cat is <strong>very</strong> grumpy.</p>
Order is extremely important because this
<p>My cat is <strong>very grumpy.</p></strong>
Gives us
<p>My cat is <strong>very grumpy.</p></strong>
It might seem small but this is a huge difference in what you are trying to communicate.
Empty Elements
Some elements have no content and are called empty elements. Take the <img> element that we already have in our HTML page: <img src="images/firefox-icon.png" alt="My test image" />
This contains two attributes, but there is no closing </img> tag and no inner content. This is because an image element doesn’t wrap content to affect it. Its purpose is to embed an image in the HTML page in the place it appears.
Here, we have some detailed information on HTML formatting:
<!DOCTYPE html>— doctype. It is a required preamble. In the mists of time, when HTML was young (around 1991/92), doctypes were meant to act as links to a set of rules that the HTML page had to follow to be considered good HTML, which could mean automatic error checking and other useful things. However these days, they don’t do much and are basically just needed to make sure your document behaves correctly. That’s all you need to know for now.<html></html>— the<html>element. This element wraps all the content on the entire page and is sometimes known as the root element. It also includes the lang attribute, setting the primary language of the document.<head></head>— the<head>element. This element acts as a container for all the stuff you want to include on the HTML page that isn’t the content you are showing to your page’s viewers. This includes things like keywords and a page description that you want to appear in search results, CSS to style our content, character set declarations, and more.<meta charset="utf-8">— This element sets the character set your document should use to UTF-8 which includes most characters from the vast majority of written languages. Essentially, it can now handle any textual content you might put on it. There is no reason not to set this and it can help avoid some problems later on.<meta name="viewport" content="width=device-width">— This viewport element ensures the page renders at the width of viewport, preventing mobile browsers from rendering pages wider than the viewport and then shrinking them down.<title></title>— the<title>element. This sets the title of your page, which is the title that appears in the browser tab the page is loaded in. It is also used to describe the page when you bookmark/favorite it.- <
body></body>— the<body>element. This contains all the content that you want to show to web users when they visit your page, whether that’s text, images, videos, games, playable audio tracks, or whatever else.
Markup Headings
Heading elements allow you to specify that certain parts of your content are headings — or subheadings. In the same way that a book has the main title, chapter titles, and subtitles, an HTML document can too. HTML contains 6 heading levels, <h1> - <h6>, although you’ll commonly only use 3 to 4 at most:
Our 4 different heading levels and how they look.
<h1>My main title</h1>
My main title
<h2>My top level heading</h2>
My top level heading
<h3>My subheading</h3>
My subheading
<h4>My sub-subheading</h4>
My sub-subheading
Notice how much smaller they get?
Lists
A lot of the web’s content is lists and HTML has special elements for these. Marking up lists always consists of at least 2 elements. The most common list types are ordered and unordered lists:
Unordered lists are for lists where the order of the items doesn’t matter, such as a shopping list. These are wrapped in a <ul> element.
Ordered lists are for lists where the order of the items does matter, such as a recipe. These are wrapped in an <ol> element.
This is how our use of lists would look
<p>At Mozilla, we're a global community of</p>

<ul>
  <li>technologists</li>
  <li>thinkers</li>
  <li>builders</li>
</ul>

<p>working together…</p>
Links
Links are very important — they are what makes the web a web! To add a link, we need to use a simple element — <a> — “a” being the short form for “anchor”. To make text within your paragraph into a link, follow these steps:
Choose some text. We chose the text “Google”.
Wrap the text in an <a> element, as shown below:
<a>Google</a>
Give the <a> element an href attribute, as shown below:
<a href="">Google</a>
Then we fill in the value of this attribute with the web address that you want the link to:
<a href="https://www.google.com/">Google</a>
Key Note
- You might get unexpected results if you omit the https:// or http:// part, called the protocol, at the beginning of the web address. After making a link, click it to make sure it is sending you where you wanted it to.